Description
JoomlaXTC Timeline component provides an easy way to implement TimelineJS3 library to create smooth and sleek slideshows of content organized by date from sources such as Joomla! articles, K2 items, GoogleDocs or custom-made timelines.
Each content item can contain any of the following media elements:
- Images
- Online Videos from Vimeo, DailyMotion, Vine, and YouTube
- SoundCloud
- Google Maps
- Google Plus photos
- Flickr
- Imgur images
- DocumentCloud
- Wikipedia
- Storify
- Blockquote text
Installation
Download the ZIP files and use the Joomla Extension Manager to install them on your website. By having individual ZIP files for the component and modules you can choose what to install and keep your system bloat-free.
The Timeline Browser
The timeline display works as a browser where you can navigate thru multiple content items organized by time. There are several parts in the display:

Click on the arrows on the sides to scroll thru the timeline items. You can also swipe or drag the bottom part to navigate. The Zoom controls on the left will adjust the time scale.
Publishing Timelines
Timeline can display content from four different sources:
- Custom entries
- Joomla articles
- K2 items
- Google spreadsheet
Custom entries
Showing a custom-made timeline is a three-step process, first you need to create a Timeline by going to the Timeline component in Joomla's administrator area:
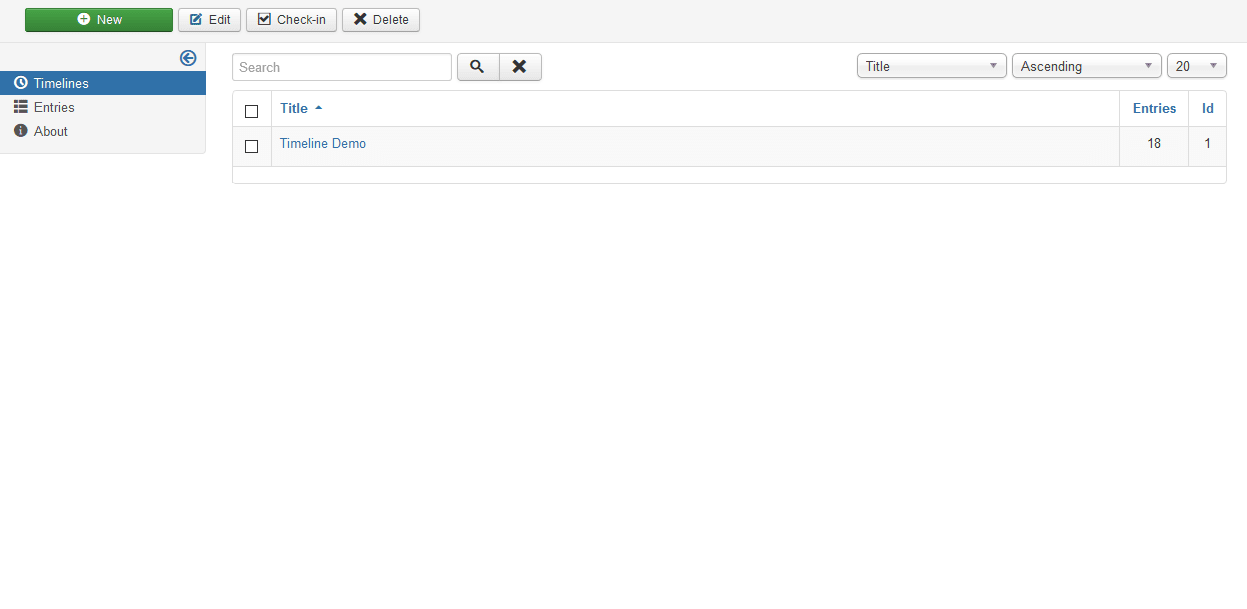
Then, while on the "Timeline" option in the left menu, click on the green "New" button to create a new Timeline:
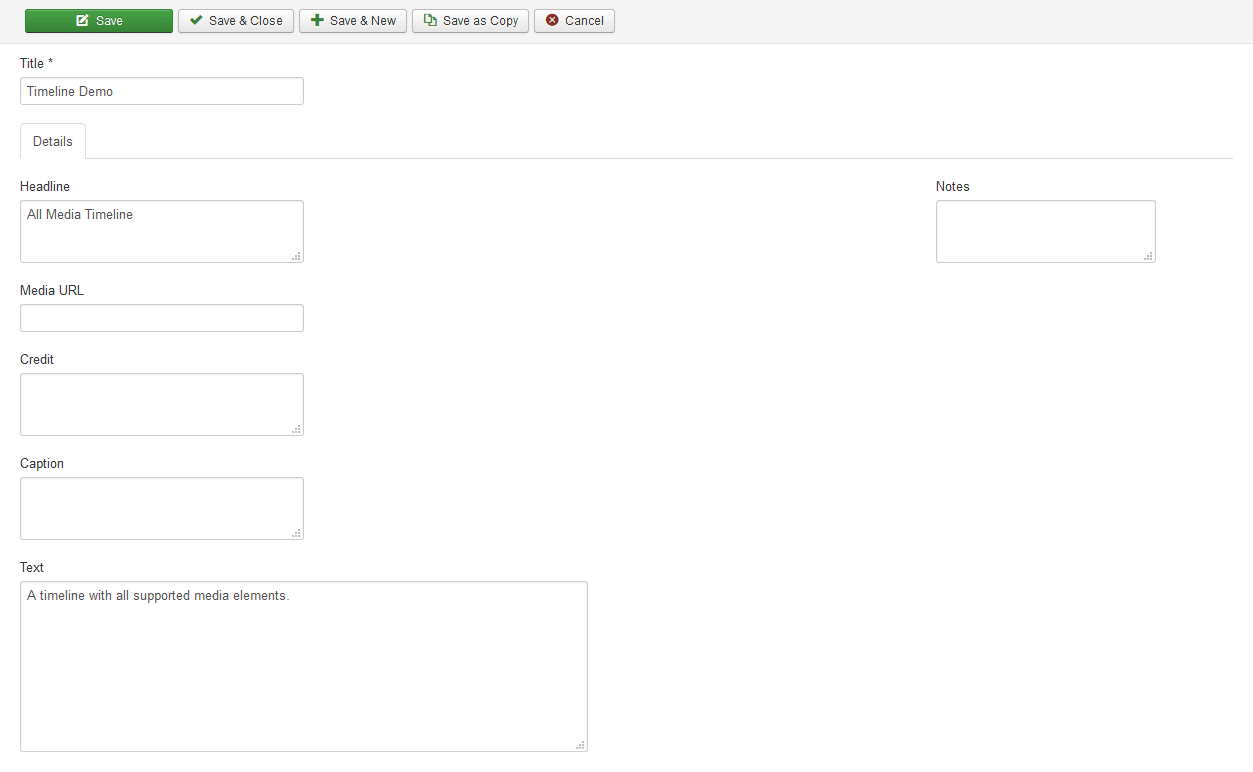
Fill each parameter field according to your needs then click on one of the standard Save buttons to store your changes:
- Title
- The timeline title. All timelines must have a title.
- Headline
- An optional text to be shown in the headline area of the display.
- Media URL
- An optional URL for one of the supported media elements. Use absolute URLs for best results.
- Credit
- Depending on the media element type (such as images), this optional credit text will be shown in the credit area below the image.
- Caption
- Optional text to be shown as media caption (if supported).
- Text
- The main text to be shown in the slide.
- Notes
- Optional notes or remarks about the timeline. The text in this field is not shown anywhere and is only here for your convenience.
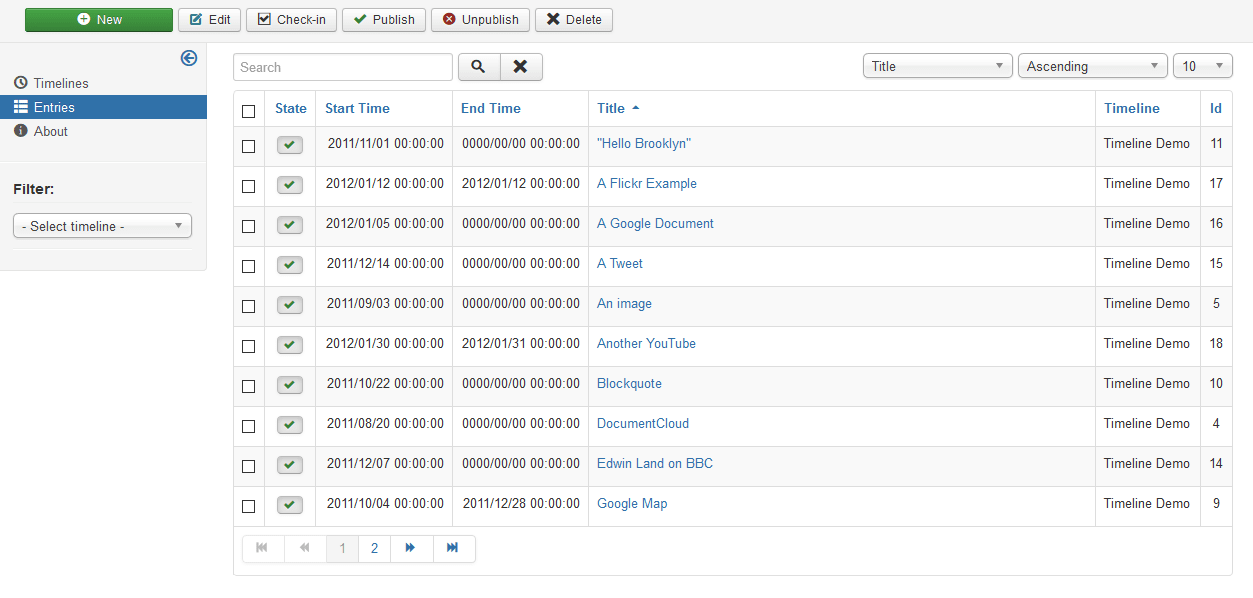
Once you have added a Timeline, you can start creating entries for it. Go back to the main Timeline component page and click on the "Entries" option in the left menu to edit or create timeline entries:
Add a new entry by clicking on the "New" button:
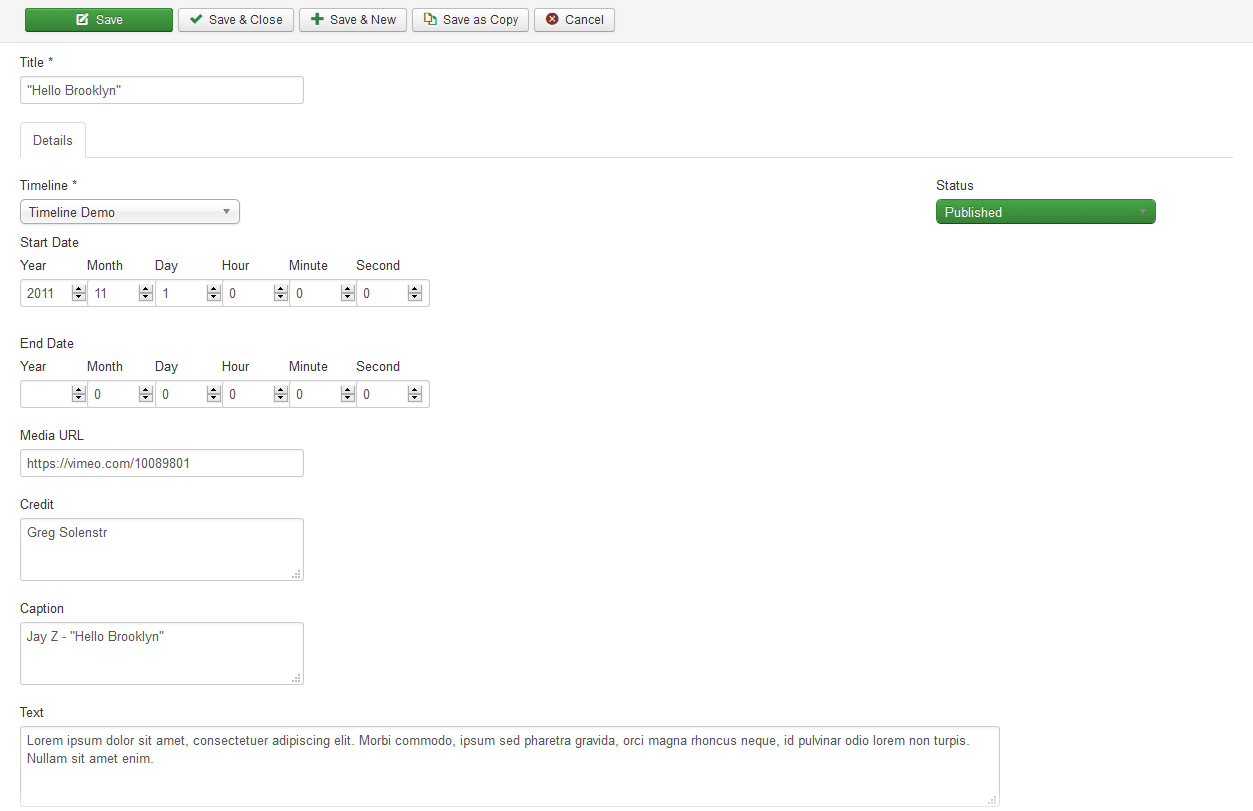
And fill the parameter fields with the desired information:
- Title
- The entry title. All entries must have a title.
- Timeline
- Select the parent Timeline for this entry (created on the previous step).
- Start Date
- Use the time fields to configure the beginning time of the entry. Negative years (BC) are accdepted. If you are not interested in showing some of the date or time fields just leave them empty.
- End Date
- Use the time fields to configure the ending time of the entry. Negative years (BC) are accdepted. If you are not interested in showing some of the date or time fields just leave them empty.
- Media URL
- An optional URL for one of the supported media elements. Use absolute URLs for best results.
- Credit
- Depending on the media element type (such as images), this optional credit text will be shown in the credit area below the image.
- Caption
- Optional text to be shown as media caption (if supported).
- Text
- The main text to be shown in the slide.
- Notes
- Optional notes or remarks about the timeline. The text in this field is not shown anywhere and is only here for your convenience.
You can create any number of entries for a timeline however, keep in mind the amount of content shown to users might demand too many resources from their browsers. Most users can easily handle around 20 or 25 entries per timeline.
The last step of the process is to publish your timeline under a menu entry. Use Joomla's Menu Manager to add a new menu item, then click on the blue button in the "Menu Item Type" parameter field to choose a menu type. Search for Timeline component and click on "Custom timeline":
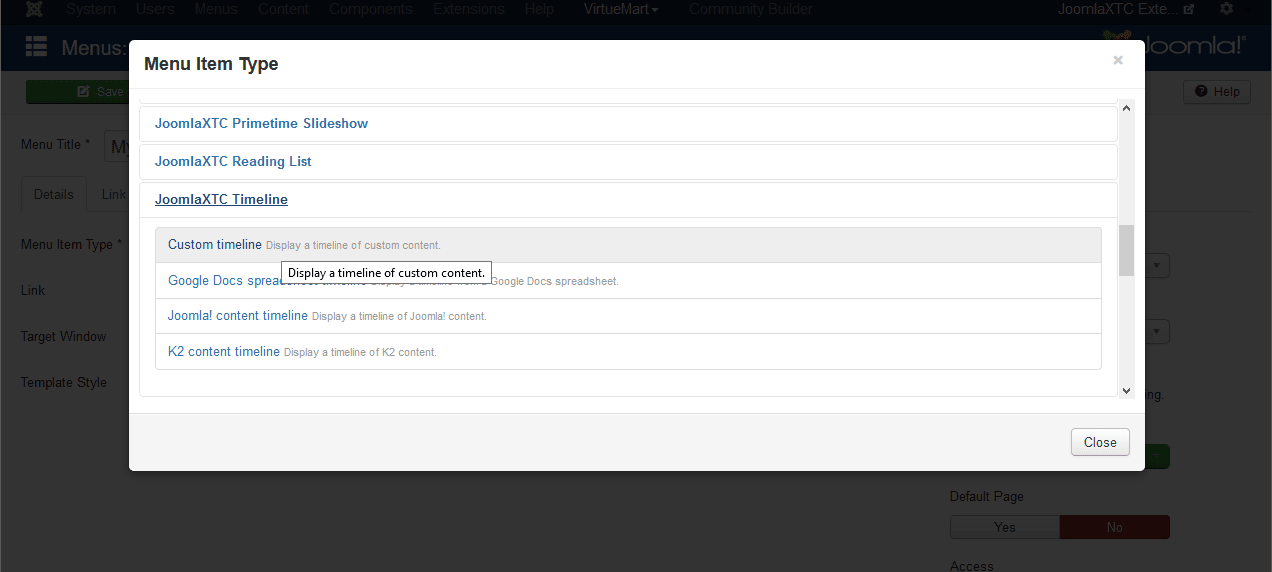
Then customize the menu option by adjusting the output by changing the parameters under "Options" tab as follows:

- Timeline
- Select the parent Timeline. All entries linked to this timeline will be included for display.
- Theme
- Select a bright or dark color theme for the display.
- Font
- Multiple fonts are available to display content. Select any that matches your website design.
- Display Height
- A display height (in pixels) must be set for all timelines. You have to adjust this value to suit your content.
- Default date format
- Shows dates using a custom format (use php Date() options).
- Start slide
- Sets the initial slide to be shown (default = 0).
- Start from end?
- Enabling this option will make the display start from the last entry (the most chronologically recent one).
- Show title?
- Enables or disables entry title display.
- Show navigation date?
- Enables or disables date display on the navigation arrows.
- Show navigation title?
- Enables or disables titles on navigation arrows.
- Enable content plugins?
- Enables or disables content plugins. The results of this option are highly dependant on JavaScript compatibility and other aspects of content plugins. Your mileage may vary.
Edit any other menu entry parameter and click on "Save" icon to store your changes. Go to your website's frontend and click on the recently added menu entry to see the timeline display.
Joomla! Articles
In this mode, the Timeline display is built using Joomla! article information from one or more categories. The Start Publishing and Finish publishing article dates are used to place the articles and the Intro text is shown as content.
Adding a menu entry for a Joomla content timeline is similar to a custom one except this time you need to choose "Joomla! content timeline" as menu item type. The menu parameters are very similar as well:
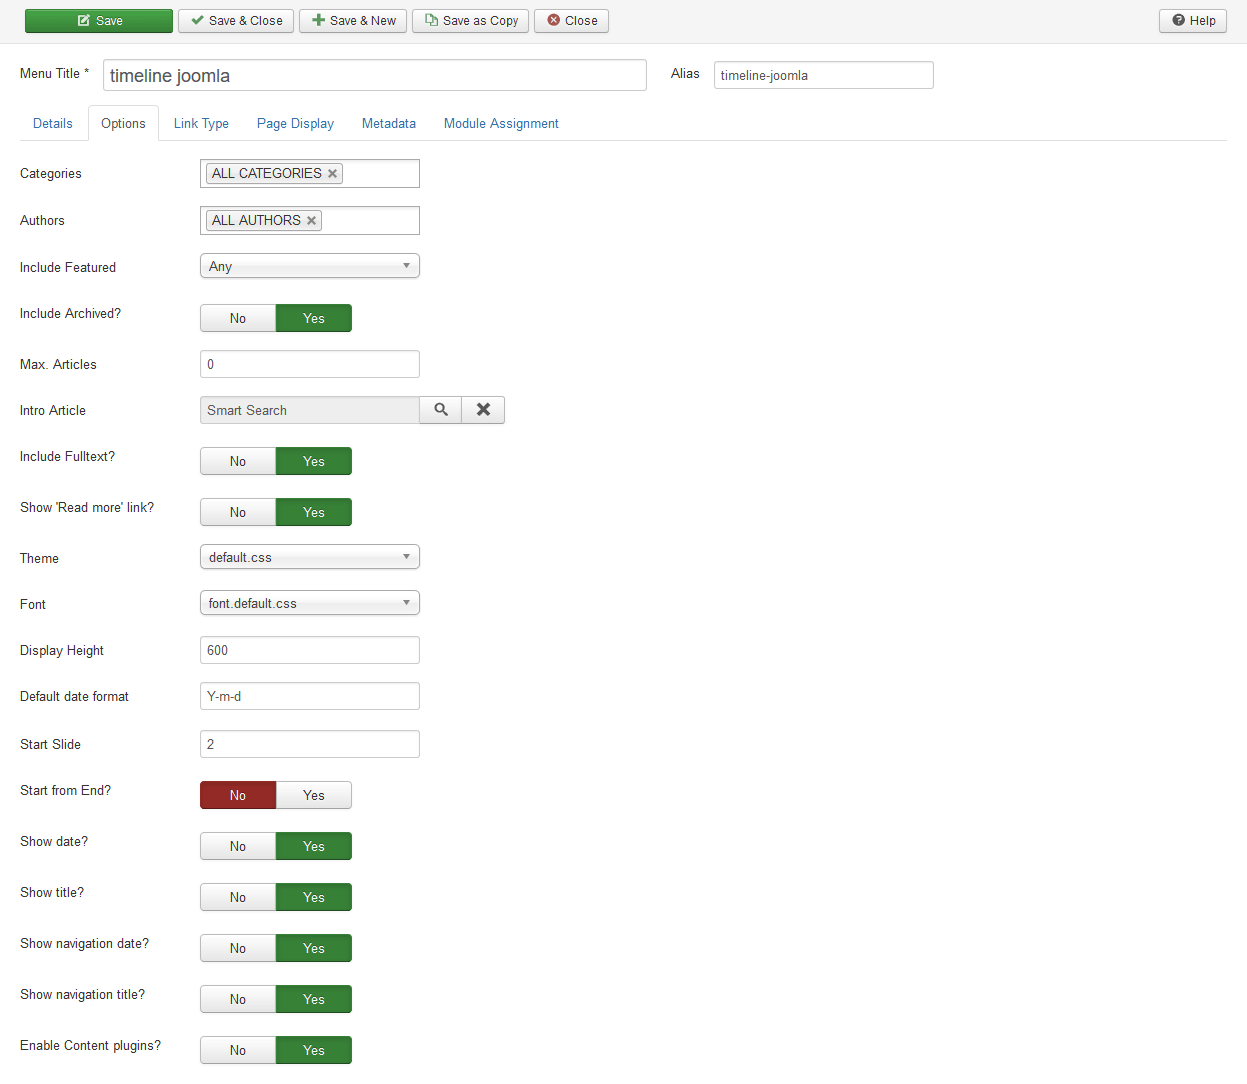
- Categories
- Select one or more categories where to choose articles from. Option ALL CATEGORIES will display articles from all categories. Be wary this may cause slow response times if you have many articles.
- Authors
- Select one or more author usernames to choose articles from. The option ALL AUTHORS will disable the filter.
- Include featured?
- Select what kind of articles to show according to their Featured attribute.
- Include archived?
- Enable this option if you wish to include articles marked as Archived.
- Max. articles
- Limit the amount of articles shown.
- Intro article
- Select an article to serve as the timeline cover.
- Show fulltext?
- Enable this option to display the article's full text instead.
- Show 'Read more' link?
- This option enables a "Read more" link on the display pointing to the article's page.
- Theme
- Select a bright or dark color theme for the display.
- Font
- Multiple fonts are available to display content. Select any that matches your website design.
- Display Height
- A display height (in pixels) must be set for all timelines. You have to adjust this value to suit your content.
- Default date format
- Shows dates using a custom format (use php Date() options).
- Start slide
- Sets the initial slide to be shown (default = 0).
- Start from end?
- Enabling this option will make the display start from the last entry (the most chronologically recent one).
- Show title?
- Enables or disables entry title display.
- Show navigation date?
- Enables or disables date display on the navigation arrows.
- Show navigation title?
- Enables or disables titles on navigation arrows.
- Enable content plugins?
- Enables or disables content plugins. The results of this option are highly dependant on JavaScript compatibility and other aspects of content plugins. Your mileage may vary.
K2 items
Provided you have the K2 component installed, you can fetch K2 item information in a similar way than Joomla. Select "K2 content timeline" as Menu item type and configure the options following the same rules:

- Categories
- Select one or more categories where to choose items from. Option ALL CATEGORIES will display items from all categories. Be wary this may cause slow response times if you have many items.
- Authors
- Select one or more author usernames to choose items from. The option ALL AUTHORS will disable the filter.
- Include featured?
- Select what kind of items to show according to their Featured attribute.
- Max. items
- Limit the amount of items shown.
- Intro item
- Select an item to serve as the timeline cover.
- Show 'Read more' link?
- This option enables a "Read more" link on the display pointing to the article's page.
- Theme
- Select a bright or dark color theme for the display.
- Font
- Multiple fonts are available to display content. Select any that matches your website design.
- Display Height
- A display height (in pixels) must be set for all timelines. You have to adjust this value to suit your content.
- Default date format
- Shows dates using a custom format (use php Date() options).
- Start slide
- Sets the initial slide to be shown (default = 0).
- Start from end?
- Enabling this option will make the display start from the last entry (the most chronologically recent one).
- Show title?
- Enables or disables entry title display.
- Show navigation date?
- Enables or disables date display on the navigation arrows.
- Show navigation title?
- Enables or disables titles on navigation arrows.
- Enable content plugins?
- Enables or disables content plugins. The results of this option are highly dependant on JavaScript compatibility and other aspects of content plugins. Your mileage may vary.
Google Spreadsheets
Another source for Timelines are Google spreadsheets. The spreadhseet requires columns to be named as follows:
Start Date, End Date, Headline, Text, Media, Media Credit, Media Caption
Create a spreadsheet and the fill-in the rows with each timeline entry information, then set the menu entry parameters as follows:

- Spreadsheet URL
- The Google spreasheet URL.
- Theme
- Select a bright or dark color theme for the display.
- Font
- Multiple fonts are available to display content. Select any that matches your website design.
- Display Height
- A display height (in pixels) must be set for all timelines. You have to adjust this value to suit your content.
- Start slide
- Sets the initial slide to be shown (default = 0).
- Start from end?
- Enabling this option will make the display start from the last entry (the most chronologically recent one).
- Show title?
- Enables or disables entry title display.
- Show navigation date?
- Enables or disables date display on the navigation arrows.
- Show navigation title?
- Enables or disables titles on navigation arrows.
- Enable content plugins?
- Enables or disables content plugins. The results of this option are highly dependant on JavaScript compatibility and other aspects of content plugins. Your mileage may vary.
Using the modules
The modules included work exactly like the Timeline menu options but you can place them in any module position of your website. Keep in mind that due to the graphic nature of the display, and specially the height requirements, a big area might be required to show the full timeline browser.
Color Themes
JoomlaXTC Timeline allows you to choose color themes and you can add your own custom versions by copying the ".css" files located in the com_jxtctimeline/assets/css folder. It is advisable to never change any of the original files that come with the component, instead, make a copy of an existing theme and do your changes in that copy. This way you will still have the original for reference purposes and also your work won't be lost if you update/reinstall the extension in the future.
Once you have finished your custom CSS file, go to any of the Menu entries for Timeline and change the theme parameter to use your new folder.
Upgrading from a previous version
Timeline component version 2.x uses a new version of TimelineJS3 library and includes new options which may cause compatibility issues with previous timeline versions (some media types are not supported any more). If your current Timeline 1.x component is working fine then you can skip this update. On the other hand, if some of the media links don't work anymore on your 1.x version then you might want to install the latest version of this component. There is no need to uninstall the old one before updating but you have to edit, review and save your existing timeline entries after the process to ensure they work.
Copyright 2016 Monev Software LLC
www.joomlaxtc.com

