Inset Position

In the Inset position we use our PowerTabs Component / Module to create a Javascript based slideshow with CSS3 effects. The PowerTabs Component and Module is a JoomlaXTC extension and is available to Extensions Club, Combo Plan, and Developer Club Members and in the single Template Purchase Full Package. It is also pre configured and loaded into the Quickstart install version.
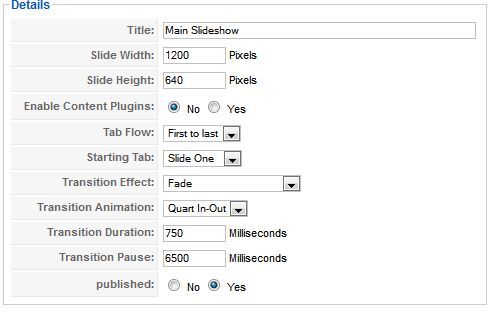
In order to recreate the Slideshow you will first need to upload the PowerTabs Component and Module to your Joomla install. Next, open the PowerTabs Component and select Slideshows and create a new slideshow with the following details:
Next, copy the layout mark up below and paste it into the Template Text Area in the Design window.
<div align="center">{slideshow}</div>
<div align="center">
<div class="tabdiv">{tab}</div>
<div class="tabdiv">{tab}</div>
<div class="tabdiv">{tab}</div>
</div>
You can now save the Slideshow settings. Next, we will set up the 3 main slides by selecting Tabs in the component admin panel. Create a new Tab and copy the settings below:
TAB ONE:

In the Text 1 2 and 3 areas copy the text below or add your own custom text:
TEXT 1
Ante diam egat
TEXT 2
Aptent amet felis
TEXT 3
“Purus ornare ullamcorper. Non magna at. Curabiturvestibulum faucibus”
We can now move onto setting up the Tab Images and Layouts. First select Tab Style "images" and select the following:
Active Tab Image: images/tab-on.png
Inactive Tab Image: images/tab-off.png

The final step is the Custom layout for the Slide Settings. First, select custom and copy the code below in the the Custom Slide Design text area:
<div style="position:relative;height:550px;">
<div class="mainslide2 slide_from_left" style="width:276px; height:354px;position:absolute;top:70px;left:200px;"></div>
<div class="mainslide slide_from_top" style="width:342px; height:439px;z-index:10;position:absolute;top:30px;left:429px;"></div>
<div class="mainslide2 slide_from_right" style="width:276px; height:354px;position:absolute;top:70px;right:200px;"></div>
</div>
<div align="center" class="intro_cont">
<div class="sp-container">

<span class="intro_1">{text1}</span><span class="intro_2">{text2}</span>
<p class="intro_sm">{text3}</p>


</div>
</div>
Before we move onto the next Tab we should take a moment to inspect the Custom Slide Design code and how it works.
The images are called with DIV Classes from the template CSS files. The images for the 3 slides are stored in the template's images/backgrounds/ folder. You can find the image DIV classes in the template's css folder in GRID.CSS on or around line #227.
To change the images with your own custom im ages you will first need to upload them to the template's images/backgrounds/ folder.
Next, you will need to open the GRID.CSS on or around line #227 and edit the image names with your own custom image names and edit the width and height settings. Please view the CSS code below:
/* ----------------------------------------------*/
/* M 00 - Module Styles (Main Slideshow Images)
/* ----------------------------------------------*/
.mainslide {background:url(/backgrounds/pad1.png) no-repeat 50% 60%; height:439px; width:342px;}
.mainslide2 {background:url(/backgrounds/pad2.png) no-repeat 50% 60%; height:354px; width:276px;}
.mainslide21 {background:url(/backgrounds/phone1.png) no-repeat 50% 40%; height:439px;width:342px;}
.mainslide22 {background:url(/backgrounds/phone2.png) no-repeat 50% 70%; height:365px;width:188px;}
.mainslide31 {background:url(/backgrounds/air1.png) no-repeat 50% 40%; height:402px;width:711px;}
.mainslide32 {background:url(/backgrounds/air2.png) no-repeat 50% 70%; height:278px;width:543px;}
.mainslide33 {background:url(/backgrounds/air3.png) no-repeat 50% 70%; height:278px;width:543px;}
The first Tab uses .mainslide and .mainslide2, the second Tab uses .mainslide21 and .mainslide22, the third Tab uses .mainslide31, .mainslide32, and .mainslide33.
Now that we understand where the images are coming from and how to edit in the CSS files, let's jump back over to the PowerTabs Custom Layout Design.
The layout design is responsible for calling the images, positioning them, adding CSS3 animations, and adding the custom text.
Let's start by looking at the 3 IPAD image classes.
<div style="position:relative;height:550px;">
<div class="mainslide2 slide_from_left" style="width:276px; height:354px;position:absolute;top:70px;left:200px;"></div>
<div class="mainslide slide_from_top" style="width:342px; height:439px;z-index:10;position:absolute;top:30px;left:429px;"></div>
<div class="mainslide2 slide_from_right" style="width:276px; height:354px;position:absolute;top:70px;right:200px;"></div>
</div>
First we set the overall height of the DIV Container for the images:
<div style="position:relative;height:550px;">
Next we call the first image with the DIV Class "mainslide2" - The calls the CSS for the image, in addition to the main image call we also add a CSS3 class called "slide_from_left" - this makes the image slide into view with the CSS3 animation property. In order to position the image we add a CSS Style to the DIV. In the style we set the width and the height along with the positioning of the image by adding TOP and LEFT values.
<div class="mainslide2 slide_from_left" style="width:276px; height:354px;position:absolute;top:70px;left:200px;"></div>
The next DIV is the center IPAD using the "mainslide" DIV class. This is the same as the mainslide2 but we add the "slide_from_top" class and a Z-Index value of 10 to position the image ontop of the other images.
<div style="position:relative;height:550px;">
<div class="mainslide slide_from_top" style="width:342px; height:439px;z-index:10;position:absolute;top:30px;left:429px;"></div>
</div>
The final DIV is the right IPAD using the "mainslide2" DIV class. This is the same as the mainslide2 left IPAD but we add the "slide_from_right" class and add spacing to the right since it is coming in from the right side.
<div class="mainslide2 slide_from_right" style="width:276px; height:354px;position:absolute;top:70px;right:200px;"></div>
</div>
Now that we have covered how the images are called, positioned, and animated lets take a look at the text area below the images.
<div align="center" class="intro_cont">
<div class="sp-container">


<span class="intro_1">{text1}</span><span class="intro_2">{text2}</span>
<p class="intro_sm">{text3}</p>


</div>
</div>
First we open a DIV that aligns the text center and adds the Class for "intro_cont". The Class for the "intro_cont" can be found in the GRID.css file on or around line #238. The CSS is as follows:
.intro_cont {position:relative;}
This class aligns the text with position "relative"
Next we open the "sp-container" DIV that animates the text using CSS3 animation. The Class for the "sp-container" can be found in the styleXX.css file. Next, we display the TEXT from Text 1,2, and 3.
<span class="intro_1">{text1}</span><span class="intro_2">{text2}</span>
<p class="intro_sm">{text3}</p>
And that's it!
Now you should have an understanding of how each Tab is created and now we can move on the configuration of Tabs 2 and 3.
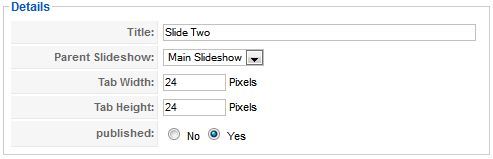
TAB TWO: Create a new Tab and copy the settings below:
In the Text 1 2 and 3 areas copy the text below or add your own custom text:
TEXT 1
Egestas mauris
TEXT 2
Potenti felis eu
TEXT 3
"Sem quisquam semper etiam vel. Sed potenti odio amet ornare"
We can now move onto setting up the Tab Images and Layouts. First select Tab Style "images" and select the following:
Active Tab Image: images/tab-on.png
Inactive Tab Image: images/tab-off.png
The final step is the Custom layout for the Slide Settings. First, select custom and copy the code below in the the Custom Slide Design text area:
<div style="position:relative;height:500px;">

 <div class="mainslide22 slide_from_left" style="position:absolute; top:65px;left:350px;height:365px;width:188px;"> </div>

  <div class="mainslide21 slide_from_top" style="position:absolute;z-index:10;top:30px; left:429px;height:439px;width:342px;"></div>

  <div class="mainslide22 slide_from_right" style="position:absolute; top:65px;right:350px;height:365px;width:188px;" valign="bottom"></div>

</div>

<div align="center" class="intro_cont">
<div class="sp-container">

<span class="intro_1">{text1}</span><span class="intro_2">{text2}</span>
<p class="intro_sm">{text3}</p>


</div>
</div>
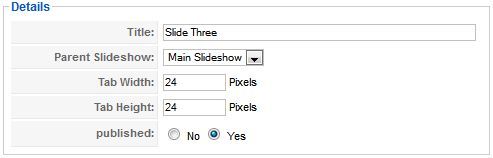
TAB THREE: Create a new Tab and copy the settings below:
In the Text 1 2 and 3 areas copy the text below or add your own custom text:
TEXT 1
Dui dis donec
TEXT 2
Amet aptent sapien
TEXT 3
"In consequat aenean. Ut sem libero amet. Parturient pellentesque"
We can now move onto setting up the Tab Images and Layouts. First select Tab Style "images" and select the following:
Active Tab Image: images/tab-on.png
Inactive Tab Image: images/tab-off.png
The final step is the Custom layout for the Slide Settings. First, select custom and copy the code below in the the Custom Slide Design text area:
<div style="position:relative;height:500px;">
	<div class="mainslide32 slide_from_left" style="position:absolute; top:190px; left:50px; height:278px;width:543px;"></div>
	<div class="mainslide31 slide_from_top" style="position:absolute; top:50px; left:244px; height:402px;width:711px;z-index:10;"></div>
	<div class="mainslide33 slide_from_right" style="position:absolute; top:190px; right:50px; height:278px;width:543px;"></div>
</div>

<div align="center" class="intro_cont">
<div class="sp-container">

<span class="intro_1">{text1}</span><span class="intro_2">{text2}</span>
<p class="intro_sm">{text3}</p>


</div>
</div>
Now we have set up the PowerTabs component and can publish the Module. Open the Joomla Module Manager and create a new module using the PowerTabs module. Next set the module position to Inset and select the Main Slideshow in the module parameters.
